
Composting
Composting at Home Without the Smell
The brown-to-green ratio, bin options, and turning schedule that keep home compost odor-free and productive.
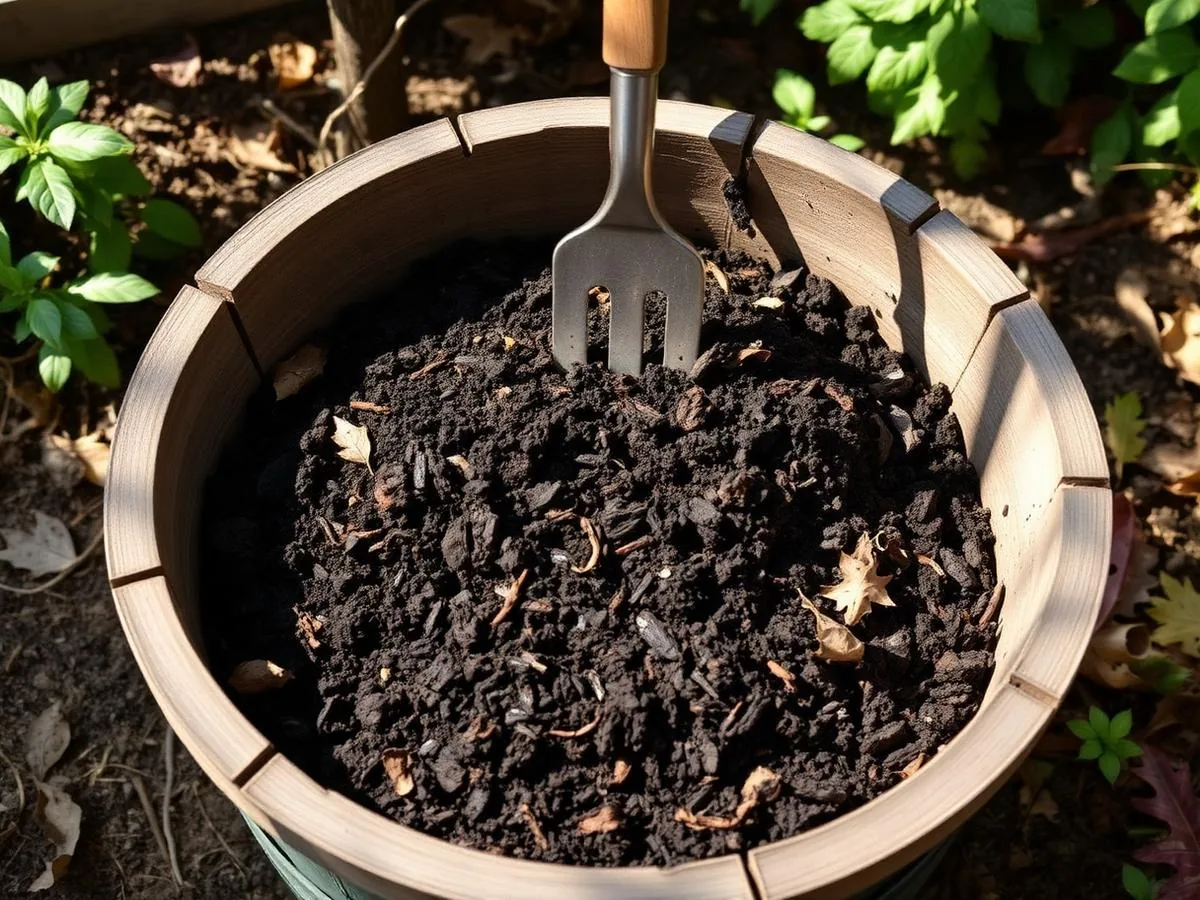
Why home compost smells (and why it doesn't have to)
Almost every complaint we hear about home composting traces back to one issue: too much wet, nitrogen-rich material and not enough dry carbon. A pile of pure grass clippings or food scraps turns anaerobic within days, and anaerobic decomposition is what produces that sour, rotten-egg smell.
Properly balanced compost — roughly two to three parts carbon-rich "browns" to one part nitrogen-rich "greens" by volume — breaks down aerobically instead. Aerobic decomposition smells earthy, like a forest floor, not rotten. That difference is entirely manageable with the right inputs and a bit of attention.
This guide covers bin selection, what actually belongs in the pile, the ratio and turning schedule that prevent odor, and troubleshooting for the handful of problems that come up most often.
Choosing a bin that fits your space
There's no single right bin — the correct choice depends on yard space, climate, and how much food waste your household generates. Enclosed tumblers work well on patios and in suburban yards where a loose pile isn't practical; open three-bin systems suit larger properties with more yard waste to process.
Comparing common bin types
| Bin type | Cost | Best for | Turnaround |
|---|---|---|---|
| Tumbler | $80-200 | Small yards, patios | 4-8 weeks |
| Three-bin system | $100-300 (DIY lower) | Larger yards, heavy leaf/yard waste | 2-4 months |
| Wire/mesh bin | $20-50 | Budget setups, leaf mold | 6-12 months |
| Countertop + outdoor pile | $15-40 | Kitchen scraps + backyard finishing | 3-6 months |
| Vermicompost bin | $50-120 | Apartments, indoor composting | 3-4 months |
What goes in — and what never should
Browns provide carbon and structure: dried leaves, shredded cardboard, straw, sawdust from untreated wood, and dry pine needles. Greens provide nitrogen and moisture: vegetable and fruit scraps, coffee grounds, fresh grass clippings, and eggshells.
Keep meat, dairy, oily foods, and pet waste out of a standard backyard pile. These items are exactly what attracts rodents and produces the strongest odors, and home piles rarely reach the sustained high temperatures needed to break them down safely.
- Browns: dry leaves, cardboard, straw, wood shavings, paper egg cartons
- Greens: fruit and vegetable scraps, coffee grounds, fresh grass, plant trimmings
- Avoid: meat, dairy, oily food, diseased plants, pet waste, glossy paper
- Chop or shred large pieces to speed up decomposition
Getting the ratio right
Think in volume, not weight. For every bucket of kitchen scraps or fresh grass clippings you add, layer in two to three buckets of dry leaves, shredded paper, or straw. This ratio is the single biggest factor in whether your pile smells.
If a pile already smells sour, the fix is almost always the same: mix in more dry browns immediately and turn the pile to introduce oxygen. You'll usually notice the odor fading within a day or two once airflow and carbon are restored.
Moisture matters too — aim for the texture of a wrung-out sponge. Too dry and decomposition stalls; too wet and you're back to anaerobic conditions and smell.
Building and maintaining your pile
Start with a coarse base layer of twigs or straw for airflow, then alternate greens and browns in roughly 4-6 inch layers. A pile at least 3 feet by 3 feet holds heat better than smaller piles, which tend to cool down and slow decomposition.
Turning schedule
- 1
Week 1
Build the pile in layers, water lightly if dry, and let it sit undisturbed to begin heating up.
- 2
Week 2
Turn the pile fully with a pitchfork, moving outer material to the center where temperatures are highest.
- 3
Weeks 3-6
Turn every 1-2 weeks, checking moisture and adding browns if you notice any odor developing.
- 4
Weeks 6-10
Turning frequency can drop as the pile cools; it's finishing when material looks dark and crumbly with no recognizable scraps.
Troubleshooting common problems
Fruit flies swarming a countertop bin usually means scraps are exposed to air too long before burial — bury fresh scraps under a layer of browns each time, or freeze scraps until you're ready to add them to the outdoor pile.
A pile that isn't heating up at all is often too small, too dry, or too low in nitrogen. Add fresh greens, water to a damp-sponge consistency, and make sure the pile has enough mass — under 3 cubic feet rarely generates real heat.
Rodents digging into a pile almost always trace back to food scraps sitting near the surface or banned items like meat or dairy having been added. Bury scraps at least 8-10 inches deep and switch to an enclosed tumbler if the problem persists.
Vermicomposting for small spaces
Worm bins are a practical option for apartments, condos, or anyone without outdoor space, using red wiggler worms to process food scraps into castings in a contained, low-odor system. A properly maintained bin under a sink or in a closet produces no smell at all.
Feed worms a similar green-heavy diet minus citrus and onions, which they tend to avoid, and keep bedding — shredded newspaper or coconut coir — damp but not soggy. A pound of worms can process roughly half a pound of scraps per day once established.
Using finished compost
Finished compost is dark brown, crumbly, and smells like soil with no trace of the original scraps. Screen it through a half-inch mesh if you want a fine texture for seed starting; unscreened compost works fine as a soil amendment or top-dressing.
Mix 1-2 inches into garden beds before planting, or use as mulch around established perennials and shrubs. Finished compost is safe to use immediately since curing has already broken down anything that could burn plant roots.
- Maintain a 2-3:1 brown-to-green ratio by volume
- Keep moisture at a wrung-out-sponge consistency
- Turn every 1-2 weeks during active decomposition
- Bury fresh scraps under browns to deter pests
- Never add meat, dairy, oil, or pet waste
- Screen finished compost before using in seed-starting mix
The bottom line
Odor-free composting comes down to balance: enough dry browns, regular turning for oxygen, and keeping the banned items out entirely. Most smell complaints resolve within a couple of days once you correct the ratio and get air moving through the pile again.
Start small, stay consistent with turning, and within a season or two you'll have a steady supply of free, high-quality soil amendment for beds, containers, and lawns alike.
Keep reading
Sources
- #compost
- #soil
- #sustainability
Frequently Asked Questions
How long does it take to make finished compost?
A well-managed hot pile with regular turning can finish in as little as 6-10 weeks, while a passive, rarely turned pile may take 6-12 months. Tumblers and smaller enclosed bins tend to finish faster than large open piles because they retain heat more consistently and are easier to turn.
Can I compost citrus peels and onions?
Yes, in moderate amounts, in a standard backyard pile — they break down fine alongside other food scraps. Avoid adding large quantities to worm bins specifically, since red wigglers tend to avoid strongly acidic or pungent material and it can slow the bin down.
Why does my compost pile attract fruit flies?
Fruit flies are drawn to exposed food scraps sitting near the surface, especially in countertop bins. Bury fresh scraps under a layer of browns each time you add them, empty countertop containers frequently, and consider freezing scraps until you're ready to add them outdoors.
Is it safe to compost weeds?
Only if your pile reliably reaches sustained temperatures above 130°F, which most backyard piles do not achieve consistently. To be safe, avoid composting weeds that have gone to seed, and bag and discard aggressive spreaders like bindweed or Bermuda grass instead.
Do I need to add a compost starter or activator?
No — compost microorganisms are already present in soil, air, and the organic materials themselves. A shovelful of finished compost or garden soil mixed into a new pile can jump-start the process, but commercial activators aren't necessary for typical results.
How do I know when compost is finished?
Finished compost is dark, crumbly, and smells like earth, with no recognizable food scraps, and it should have cooled back down to roughly ambient temperature. If you can still identify eggshells, banana peels, or other distinct pieces, give it another few weeks and turn it again.
Related Articles
Vegetable Garden Failures: How to Fix Common Problems
Discover how to diagnose and resolve common vegetable garden challenges using practical, science-based troubleshooting techniques to save your plants.
High Yield Vegetable Gardening: Advanced Methods for Success
Take your harvest to the next level by implementing intensive planting strategies, precision nutrient management, and data-driven garden planning techniques.
Automated Garden Tools for Beginners: A Complete Guide
Learn how to use smart technology to streamline your gardening chores without losing the joy of working in the soil. This guide covers the basics of garden automation for beginners.